⚡What is an API?
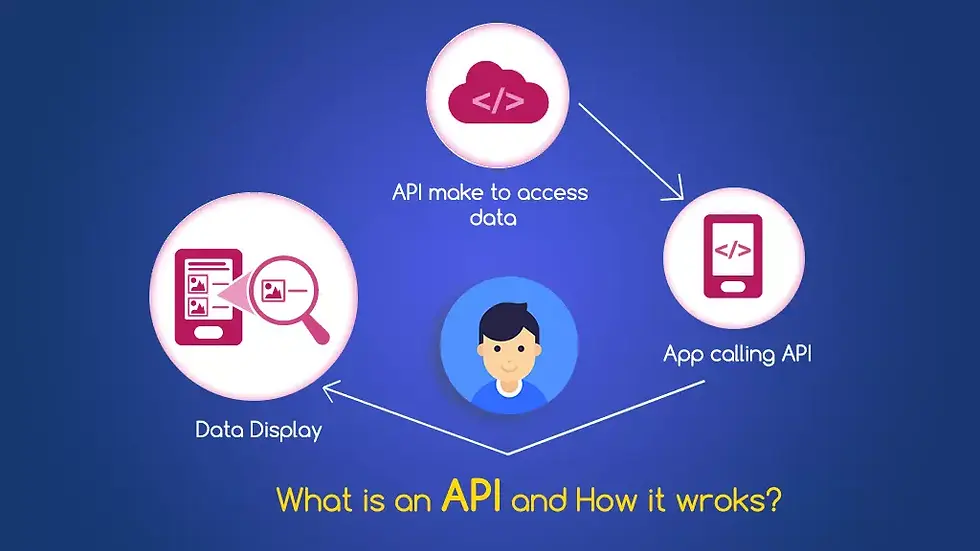
An API, or Application Programming Interface, is a set of protocols, routines, and tools for building software and applications. It specifies how software components should interact and enables communication between different systems.
APIs allow developers to access a specific set of features or data from another application, platform, or service. This allows for the creation of new applications that can integrate with existing systems, improving functionality and efficiency.
APIs can be used for a variety of purposes, including data sharing, automation, and integration with third-party services. They may be public or private, with private APIs used within an organization and public APIs available to external developers.
APIs typically use a standardized data format, such as JSON or XML, to ensure compatibility between systems. They may also require authentication or other security measures to protect sensitive data.
In summary, APIs are a powerful tool for developers that enable the creation of new applications and services by facilitating communication between different systems.
📙 How do APIs work?
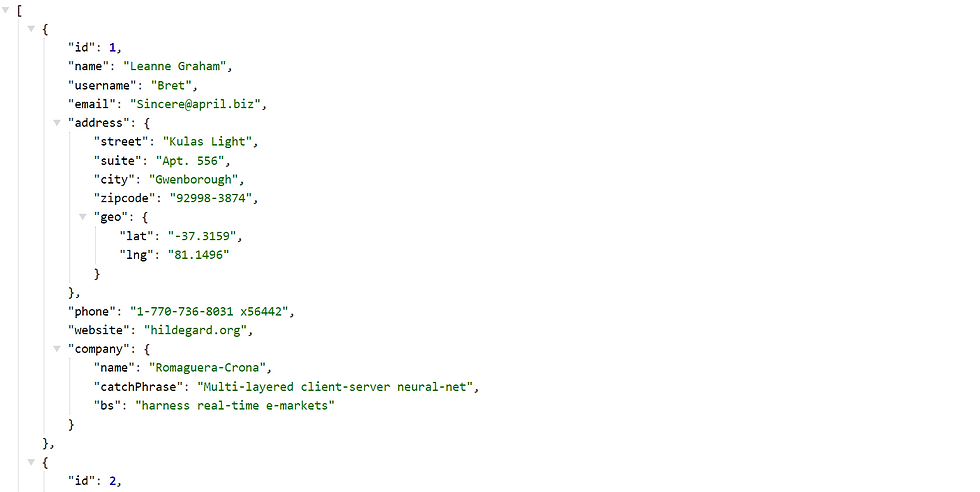
A user application can make GET, POST, PUT, or DELETE HTTP requests to a database. In return, the database sends us data, results, or responses in the form of JSON, HTML, or XML (with the JSON format being the most widely used). We then parse the JSON into a proper model class and use it in our app.
🌍 All you need to know about API integration
📘 HTTP Service
For making communication with a remote server we use various APIs which need some type of HTTP methods to get executed. So we are going to create a HttpService class, which will help us to communicate with our server.
To integrate an API in a Flutter app, the most basic and easy-to-use package is http. You can add it to your project by going to the pubspec.yaml file and adding the following line under dependencies:
http: ^0.13.4
Once you have added the package, you can import it in your code and use its methods to make HTTP requests to your API. For example, to make a GET request to an API endpoint, you can use the http.get() method and pass in the API endpoint as a URL string. Then, you can retrieve the response data from the http.Response object returned by the method.
Here's an example of making a GET request using the http package:
import 'package:http/http.dart' as http;

Future<void> fetchData() async {
  final response = await http.get(Uri.parse('<https://jsonplaceholder.typicode.com/users>'));
  if (response.statusCode == 200) {
    final data = response.body;
    // Do something with the data
  }
}
In the above code, we use the http.get() method to make a GET request to the users API endpoint of the jsonplaceholder API. We then check the status code of the response to ensure that the request was successful (status code 200). Finally, we retrieve the response data from the http.Response object returned by the method and do something with it.
Note that this is just a basic example of using the http package to make a GET request. Depending on your specific API, you may need to use other HTTP methods such as POST, PUT, or DELETE, or you may need to include headers or query parameters in your requests.
Core methods of https -
post Method - This method uses a URL and POST method to post the data and return a Future<Response>. It is used to send the data on the web.
get Method - get method uses a URL and fetches the data in JSON format.
delete Method- This method is used to delete the data using the DELETE method.
head Method - Uses the URL to request the data using the HEAD method and return the response as Future<Response>.
read Method - It is similar as get method, used to read the data.
put Method - It uses the specified URL and update the data specified by the user using the PUT method.
patch Method - It is very similar to the put method, used to update the data.
📗 Model Class
While dealing with APIs, we may get a large number of data and which may have numerous fields so coding each and every JSON field into Dart Objects (this is also called JSON parsing ) will come in handy.
To access data from APIs in Flutter, it's recommended to create a model class to parse the JSON response. This can be done by using a simple method. Go to https://app.quicktype.io and paste the JSON response on the left side. In the options on the right side, select Dart, and your model class will be generated. You can then change the name of the class.
Once you have the model class, you can use it to parse the JSON data in your app. In the api_service.dart file, you can create a function that returns a list of the model objects. First, you make the API call and then check if the API call was successful or not using response.statusCode. If the API call is successful, the statusCode will be 200. If the statusCode is 200, you can convert the JSON response into a list of model objects using the method generated by quicktype, and then return the model object.
Finally, you can load the data onto your UI by making a method call to the function that returns the list of model objects.
📕 State Management
Whenever data changes we have to update our app UI accordingly. For example, when we make a network request we must show a user progress indicator until the network request is complete, once completed, we must show appropriate UI. If the request fails we must show the appropriate message to the user.
State management in Flutter is the process of managing the state of a widget tree. When dealing with APIs, state management is important to ensure that the UI is updated appropriately when data changes.
One common approach for state management in Flutter is the Provider package. This package provides a simple way to share data across the widget tree. To implement this approach, you can create a new file called user_provider.dart and define a class called UserProvider that extends ChangeNotifier.
import 'package:flutter/material.dart';
import 'package:rest_api_example/model/user_model.dart';
import 'package:rest_api_example/services/api_service.dart';

class UserProvider extends ChangeNotifier {
  List<UserModel>? _userModel;

  List<UserModel>? get userModel => _userModel;

  Future<void> getUsers() async {
    _userModel = await ApiService().getUsers();
    notifyListeners();
  }
}
In the above code, we create a class called UserProvider that extends ChangeNotifier. We define a private variable _userModel to hold the list of user models, and a public getter userModel to access this variable. We also define a getUsers method that fetches the data from the API and updates the _userModel variable. Finally, we call notifyListeners to update the UI when the data changes.
To use this provider in your app, you can wrap your widget tree with a MultiProvider widget and provide an instance of UserProvider.
Code is here …..
class HomePage extends StatelessWidget {
  const HomePage({Key? key}) : super(key: key);

  @override
  Widget build(BuildContext context) {
    final userProvider = Provider.of<UserProvider>(context);
    return Scaffold(
      appBar: AppBar(
        title: const Text('Flutter API Example'),
      ),
      body: userProvider.userModel == null || userProvider.userModel!.isEmpty
          ? const Center(
        child: CircularProgressIndicator(),
      )
          : ListView.builder(
        itemCount: userProvider.userModel!.length,
        itemBuilder: (context, index) {
          return ListTile(
            title: Text(userProvider.userModel![index].name),
            subtitle: Text(userProvider.userModel![index].email),
          );
        },
      ),
      floatingActionButton: FloatingActionButton(
        onPressed: () {
          userProvider.getUsers();
        },
        child: Icon(Icons.refresh),
      ),
    );
  }
}
In the above code, we wrap our widget tree with a MultiProvider widget and provide an instance of UserProvider. In the HomePage widget, we use Provider.of<UserProvider>(context) to access the UserProvider instance and display the data.
When the user taps the refresh button, we call userProvider.getUsers() to fetch the data from the API and update the UI. Note that we use notifyListeners() in the getUsers() method to update the UI when the data changes.
This is just one example of how to implement state management in Flutter when dealing with APIs. There are many other packages and approaches available, depending on the complexity of your app and the specific requirements of your API.
💥 STEPS for integrating an API into flutter app
Step 1: Get the API URL and endpoints. To get the API URL (referred to as the base URL) and endpoints, go to the JSONPlaceholder website. There, you will find the different APIs that they provide. Today, we’re going to use their users API. Hence, the base URL and API endpoint will be: Base URL: https://jsonplaceholder.typicode.com API endpoint: /users The base URL for all APIs from a given database or API provider always remains the same; however, the endpoint changes depending on the API. Many API providers require you to obtain a private key (API key or access key), either by simply creating an account or by purchasing a key. The API key will be appended to the base URL. So, the new base URL will be: New base URL = BaseUrl/apiKey
Step 2: Add relevant packages into the app (http, dio, chopper, etc.). There are many packages available on pub.dev that we can use to integrate APIs in Flutter. The most widely used packages are:
http
dio
chopper
There are many more packages, though http is the most basic and easy to use. The other packages mostly act as wrappers for the http package and provide additional functionalities. Now, once you have created a new Flutter project, go to the pubspec.yaml file, and add the http package into it. Your pubspec.yaml file should look something like the following:
name: rest_api_example
description: A new Flutter project.
publish_to: 'none' # Remove this line if you wish to publish to pub.dev
version: 1.0.0+1

environment:
sdk: ">=2.15.1 <3.0.0"

dependencies:
cupertino_icons: ^1.0.2
flutter:
sdk: flutter
http: ^0.13.4

dev_dependencies:
flutter_lints: ^1.0.0
flutter_test:
sdk: flutter

flutter:
uses-material-design: true
Step 3: Create a constant file that stores URLs and endpoints. Now, it’s time to create a simple file named constants.dart that will hold all your URLs and endpoints. In our case, we only have one endpoint, but it’s a good practice to have a separate file. Your constants.dart file will look something like the following: Here, we have created a class called ApiConstants and two static variables so that we can access them without creating an instance of the class like ApiConstants.baseUrl
class ApiConstants {
  static String baseUrl = 'https://jsonplaceholder.typicode.com';
  static String usersEndpoint = '/users';
}
Step 4: Create a model class to parse the JSON. One way to access the data is by using the key directly. However, it’s an effective and easy approach to create a model class, parse the JSON, and get an object out of that JSON response. Use this to access the data directly: final data = json[0]['id']; Here, we try to access the ID of the 0th record of the JSON response. This is only easy to do when you have limited records and entries. Now, to create a model class, you will first need the entire JSON response you are getting from the API. To get that, just go to https://jsonplaceholder.typicode.com/users, and you will be able to obtain the entire JSON response, as this is a public API. In the case of a private API or custom back-end APIs, either it will be available in the documentation, or you can use Postman to hit the API and get the response. Once you have the response, you can create the model class using a simple method. Go to https://app.quicktype.io and paste the JSON response on the left side. In the options on the right side, select Dart, and your model class will be generated! You can then change the name of the class. Your model class file will look something like this.
import 'dart:convert';

List<UserModel> userModelFromJson(String str) =>
    List<UserModel>.from(json.decode(str).map((x) => UserModel.fromJson(x)));

String userModelToJson(List<UserModel> data) =>
    json.encode(List<dynamic>.from(data.map((x) => x.toJson())));

class UserModel {
  UserModel({
    required this.id,
    required this.name,
    required this.username,
    required this.email,
    required this.address,
    required this.phone,
    required this.website,
    required this.company,
  });

  int id;
  String name;
  String username;
  String email;
  Address address;
  String phone;
  String website;
  Company company;

  factory UserModel.fromJson(Map<String, dynamic> json) => UserModel(
    id: json["id"],
    name: json["name"],
    username: json["username"],
    email: json["email"],
    address: Address.fromJson(json["address"]),
    phone: json["phone"],
    website: json["website"],
    company: Company.fromJson(json["company"]),
  );

  Map<String, dynamic> toJson() => {
    "id": id,
    "name": name,
    "username": username,
    "email": email,
    "address": address.toJson(),
    "phone": phone,
    "website": website,
    "company": company.toJson(),
  };
}

class Address {
  Address({
    required this.street,
    required this.suite,
    required this.city,
    required this.zipcode,
    required this.geo,
  });

  String street;
  String suite;
  String city;
  String zipcode;
  Geo geo;

  factory Address.fromJson(Map<String, dynamic> json) => Address(
    street: json["street"],
    suite: json["suite"],
    city: json["city"],
    zipcode: json["zipcode"],
    geo: Geo.fromJson(json["geo"]),
  );

  Map<String, dynamic> toJson() => {
    "street": street,
    "suite": suite,
    "city": city,
    "zipcode": zipcode,
    "geo": geo.toJson(),
  };
}

class Geo {
  Geo({
    required this.lat,
    required this.lng,
  });

  String lat;
  String lng;

  factory Geo.fromJson(Map<String, dynamic> json) => Geo(
    lat: json["lat"],
    lng: json["lng"],
  );

  Map<String, dynamic> toJson() => {
    "lat": lat,
    "lng": lng,
  };
}

class Company {
  Company({
    required this.name,
    required this.catchPhrase,
    required this.bs,
  });

  String name;
  String catchPhrase;
  String bs;

  factory Company.fromJson(Map<String, dynamic> json) => Company(
    name: json["name"],
    catchPhrase: json["catchPhrase"],
    bs: json["bs"],
  );

  Map<String, dynamic> toJson() => {
    "name": name,
    "catchPhrase": catchPhrase,
    "bs": bs,
  };
}
Step 5: Create a file that handles the API call, and write specific methods to fetch and parse data. Now, create a file called api_service.dart that will handle the API calls.
import 'dart:developer';

import 'package:http/http.dart' as http;
import 'package:rest_api_example/constants.dart';
import 'package:rest_api_example/model/user_model.dart';

class ApiService {
  Future<List<UserModel>?> getUsers() async {
    try {
      var url = Uri.parse(ApiConstants.baseUrl + ApiConstants.usersEndpoint);
      var response = await http.get(url);
      if (response.statusCode == 200) {
        List<UserModel> _model = userModelFromJson(response.body);
        return _model;
      }
    } catch (e) {
      log(e.toString());
    }
  }
}
In the above file, we create a function called getUsersthat returns a List. The first step is to hit the GET HTTP request. The next step is to check whether the API call was successful or not using response.statusCode. If the API call is successful, the statusCode will be 200. If the statusCode is 200, we then convert the JSON (response.body) into a List using the method userModelFromJson, which is available in the model class that we created, and then return the model object.
Step 6: Use the data in your app. We have created all the required files and methods for the API, which we can call from our app’s back end. Now it’s time to load this data on our UI. We don’t have to do much, just make a method call and load that result onto the UI.
import 'package:flutter/material.dart';
import "package:restapiexample/model/user_model.dart";
import 'package:restapiexample/services/api_services.dart';


class Home extends StatefulWidget {
  const Home({Key? key}) : super(key: key);
  @override
  _HomeState createState() => _HomeState();
}

class _HomeState extends State<Home> {
  late List<UserModel>? _userModel = [];

  @override
  void initState() {
    super.initState();
    _getData();
  }

  void _getData() async {
    _userModel = (await ApiService().getUsers())!;
    Future.delayed(const Duration(seconds: 1)).then((value) => setState(() {}));
  }
  @override
  Widget build(BuildContext context) {
    return Scaffold(
        appBar: AppBar(
          title: const Text('REST Api Example'),
          backgroundColor: Colors.deepPurpleAccent.withOpacity(0.9),
        ),
        body: _userModel == null || _userModel!.isEmpty
            ? const Center(
          child: CircularProgressIndicator(),
        )
// created list view for listing different data fetched from api
            : ListView.separated( //<-- SEE HERE
          itemCount: _userModel!.length,
          itemBuilder: (context, index) {
            return ListTile(
              tileColor: Colors.white,
              leading: const CircleAvatar(
                  backgroundImage:  NetworkImage('https://img.freepik.com/premium-vector/man-avatar-profile-round-icon_24640-14044.jpg?w=2000')
              ),
              title: Text(
                '${_userModel![index].username}\n${_userModel![index].email}',
              ),
              subtitle: Text('${_userModel![index].website}'),
            );
          },
          separatorBuilder: (context, index) {//seperator after each data
            return const Divider(
              thickness: 2,
            );
          },
        )
    );
  }
}
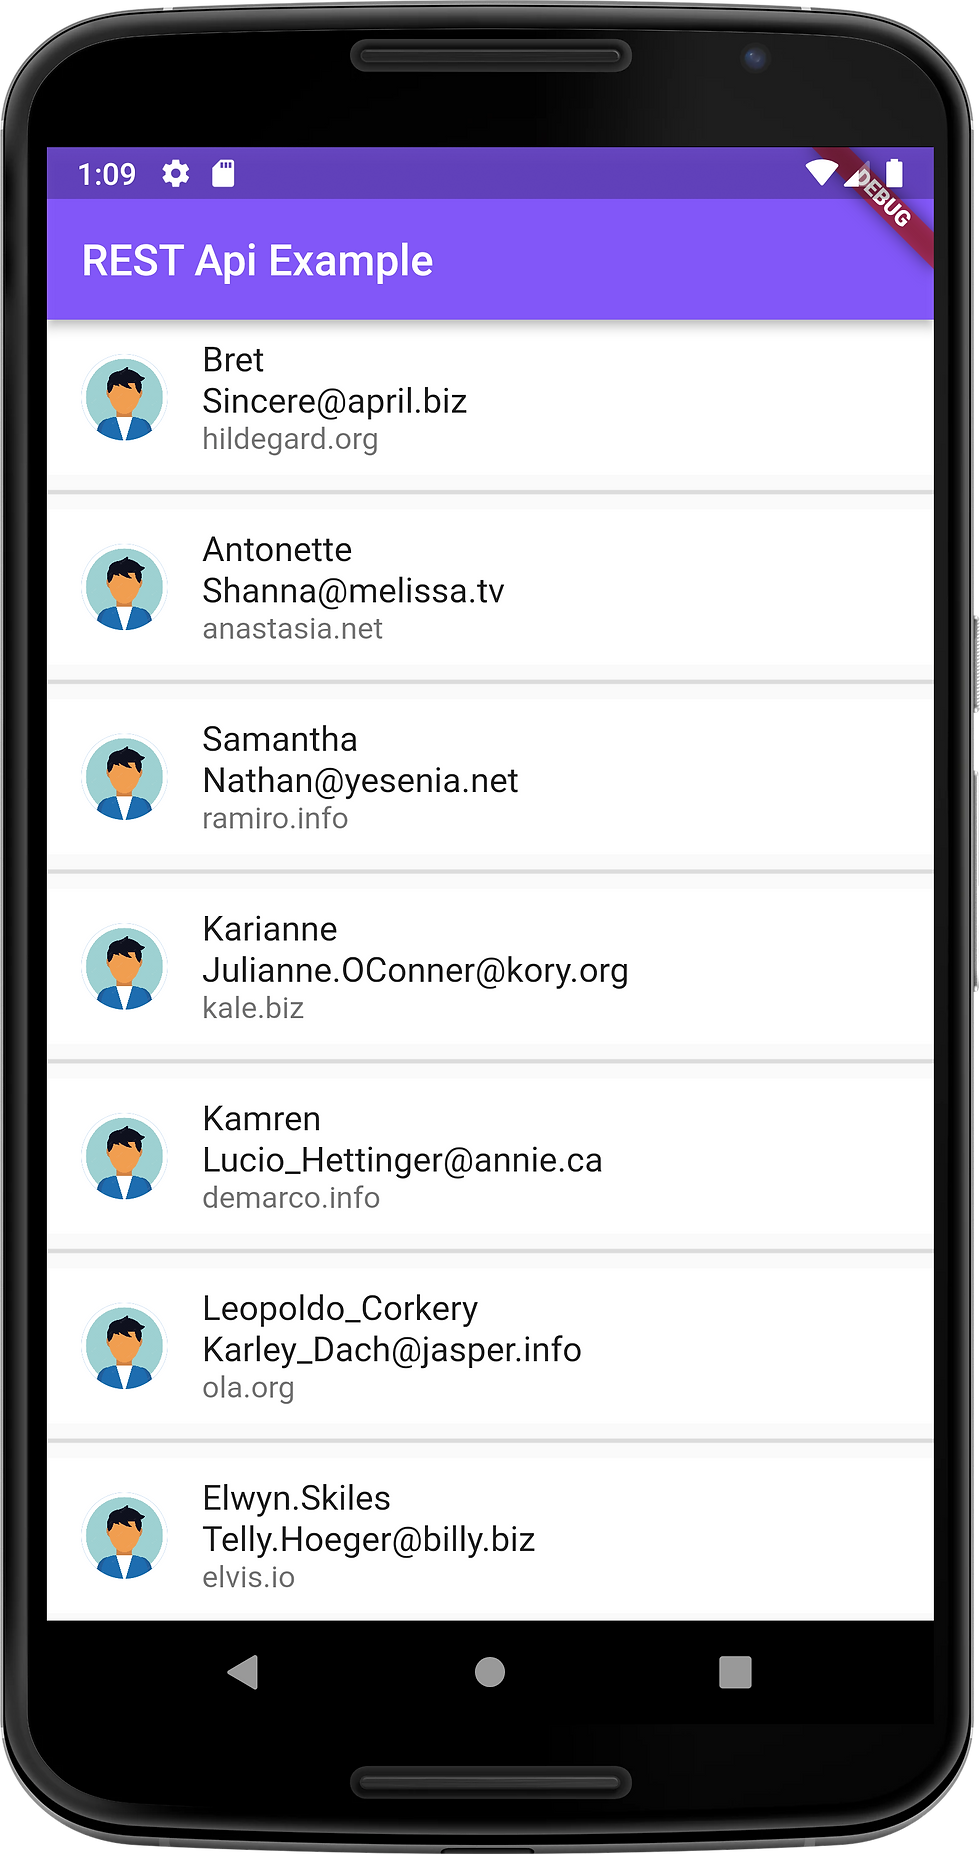
In the above code, we create an object of the type List. Then, in the initState, we call a method to get the data from our API. I have added Future.delayed in the method just so that we can simulate the API time response. The API we are using is a fake one; hence, it’s pretty fast. However, real APIs aren’t that quick. So it becomes our duty to show a loader until the API response is available. Once the response is available, we rebuild the UI to show the data. Here, I have just shown a bit of data from the model class.
♻ JSON Data -

♻ DECODED Data -

🎊Congratulations !! you integrated an API in your application.
Thanks for reading, and happy coding!
